Showing posts with label post. Show all posts

It turns out, it's not difficult to remove all passwords from our Docker Compose files

I used to hardcode my password in my demos and code samples. I know it's not a good practice, but it's just for demo purposes, it cannot be that dramatic, right? I know there are proper ways to manage sensitive information, but this is only temporary! And it must be complicated to remove all the passwords from a deployment... It turns out, IT IS NOT difficult at all, and that will prevent serious threats.

In this post, I will share how to remove all passwords from a docker-compose file using environment variables. It's quick to setup and easy to remember. For production deployment, it's better to use secrets, because environment variables will be visible in logs. That said, for demos and debugging and testing, it's nice to see those values. The code will be available on GitHub. This deployment was used for my talks during Azure Developers .NET Days: Auto-Generate and Host Data API Builder on Azure Static Web Apps and The most minimal API code of all... none

The Before Picture

For this deployment, I used a docker-compose file to deploy an SQL Server in a first container and Data API Builder (DAB) in a second one. When the database container starts, I run a script to create the database tables and populate them.

services:

  dab:
    image: "mcr.microsoft.com/azure-databases/data-api-builder:latest"
    container_name: trekapi
    restart: on-failure
    volumes:
      - "./startrek.json:/App/dab-config.json"
    ports:
      - "5000:5000"
    depends_on:
      - sqlDatabase

  sqlDatabase:
    image: mcr.microsoft.com/mssql/server
    container_name: trekdb
    hostname: sqltrek
    environment:
      ACCEPT_EULA: "Y"
      MSSQL_SA_PASSWORD: "1rootP@ssword"
    ports:
      - "1433:1433"
    volumes:
      - ./startrek.sql:/startrek.sql
    entrypoint:
      - /bin/bash
      - -c
      - |
        /opt/mssql/bin/sqlservr & sleep 30
        /opt/mssql-tools/bin/sqlcmd -U sa -P "1rootP@ssword" -d master -i /startrek.sql
        sleep infinity

As we can see, the password is in clear text twice, in the configuration of the database container and in the parameter for sqlcmd when populating the database. Same thing for the DAB configuration file. Here the data-source node where the password is in clear text in the connection string.

"data-source": {
 	"database-type": "mssql",
	"connection-string": "Server=localhost;Database=trek;User ID=sa;Password=myPassword!;",
	"options": {
		"set-session-context": false
	}
}

First Pass: Environment Variables

The easiest password instance to remove was in the sqlcmd command. When defining the container, an environment variable was used... Why not use it! To refer to an environment variable in a docker-compose file, you use the syntax $$VAR_NAME. I used the name of the environment variable MSSQL_SA_PASSWORD to replace the hardcoded password.

/opt/mssql-tools/bin/sqlcmd -U sa -P $$MSSQL_SA_PASSWORD -d master -i /startrek.sql

Second Pass: .env File

That's great but the value is still hardcoded when we assign the environment variable. Here comes the environment file. They are text files that holds the values in key-value paired style. The file is not committed to the repository, and it's used to store sensitive information. The file is read by the docker-compose and the values are injected. Here is the final docker-compose file:

services:

  dab:
    image: "mcr.microsoft.com/azure-databases/data-api-builder:latest"
    container_name: trekapi
    restart: on-failure
    env_file:
      - .env
    environment:
      MY_CONN_STRING: "Server=host.docker.internal;Initial Catalog=trek;User ID=sa;Password=${SA_PWD};TrustServerCertificate=True"
    volumes:
      - "./startrek.json:/App/dab-config.json"
    ports:
      - "5000:5000"
    depends_on:
      - sqlDatabase

  sqlDatabase:
    image: mcr.microsoft.com/mssql/server
    container_name: trekdb
    hostname: sqltrek
    environment:
      ACCEPT_EULA: "Y"
      MSSQL_SA_PASSWORD: ${SA_PWD}
    env_file:
      - .env
    ports:
      - "1433:1433"
    volumes:
      - ./startrek.sql:/startrek.sql
    entrypoint:
      - /bin/bash
      - -c
      - |
        /opt/mssql/bin/sqlservr & sleep 30
        /opt/mssql-tools/bin/sqlcmd -U sa -P $$MSSQL_SA_PASSWORD -d master -i /startrek.sql
        sleep infinity

Note the env_file directive in the services definition. The file .env is the name of the file used. The ${SA_PWD} tells docker compose to look for SA_PWD in the .env file. Here is what the file looks like:

SA_PWD=This!s@very$trongP@ssw0rd

Conclusion

Simple and quick. There are no reasons to still have the password in clear text in the docker compose files anymore. Even for a quick demo! Of course for a production deployment there are stronger ways to manage sensitive information, but for a demo it's perfect and it's secure.

During Microsoft Build Keynote on day 2, Julia Liuson and John Lambert talked about how trade actors are not only looking for the big fishes, but also looking at simple demos and old pieces of code, looking for passwords, keys and sensitive information.

How to Deploy a .NET isolated Azure Function using Zip Deploy in One-Click

In this post, I will share a few things that we need our attention when deploying a .NET isolated Azure Function from GitHub to Azure using the Zip Deploy method. This method is great for fast deployment and when your artefacts are zipped in a package.

Note The complete code for this post is available on GitHub


Understanding Zip Push/Zip Deploy

Zip Push allows us to deploy a compressed package, such as a zip file, directly to Azure. It could be part of a continuous integration and continuous deployment (CI-CD) or like in this example it could replace it. This approach is particularly useful when you want to ensure your artifacts remain unchanged across different environments or when aiming for the fastest deployment experience for users.

While CI-CD is excellent for keeping your code up-to-date, zip deployment offers the advantage of speed and consistency. It eliminates the need for compilation, leading to quicker uploads and deployments.


Preparing Your Package

It’s crucial to package with all necessary dependencies the code required. There is no operation to fetch any external packages during the deployment, the zip file will be decompressed and that's it. The best way to ensure you have everything you need is to publish your code, to a folder and then go in that folder and zip all the files.

dotnet publish -c Release -o ./out

Don't zip the folder, it won't work as expected.

Don't zip the publish folder it won't works

You need to go inside the folder and select all the files and zip them to create your deployment artefact.

From in the publish folder zip all files

The next step is to make your artefact available online. There are many ways, but for this post we are using GitHub Realease. From the GitHub repository, create a new release, upload the zipped file created earlier and publish it. Note the URL of zipped files from the release.


Preparing The ARM Template

For this one-click deployment, we need an Azure Resource Manager (ARM) template. This is a document that describes the resources that we want to deploy to Azure. To deploy the zipped file into the Azure Function there are two particularities that required our attention.

Here the sections of the template.

[...]
"resources": [
    {
        "apiVersion": "2022-03-01",
        "name": "[variables('funcAppName')]",
        "type": "Microsoft.Web/sites",
        "kind": "functionapp",
        "location": "[resourceGroup().location]",
        "properties": {
            "name": "[variables('funcAppName')]",
            "siteConfig": {
                "appSettings": [
                    {
                        "name": "FUNCTIONS_WORKER_RUNTIME",
                        "value": "dotnet-isolated"
                    },
                    {
                        "name": "WEBSITE_RUN_FROM_PACKAGE",
                        "value": "1"
                    },
                    [...]

Here we define an Windows Azure Function and the WEBSITE_RUN_FROM_PACKAGE needs to be set to 1. The WEBSITE_RUN_FROM_PACKAGE is the key that tells Azure to use the zip file as the deployment artefact.

Then to specify where the zip file is located we need to add an extension to the Azure Function.

    {
      "type": "Microsoft.Web/sites/extensions",
      "apiVersion": "2021-02-01",
      "name": "[format('{0}/ZipDeploy', variables('funcAppName'))]",
      "properties": {
        "packageUri": "https://github.com/FBoucher/ZipDeploy-AzFunc/releases/download/v1/ZipDeploy-package-v1.zip",
        "appOffline": true
      },
      "dependsOn": [
        "[concat('Microsoft.Web/sites/', variables('funcAppName'))]"
      ]
    }

The packageUri property is the URL of the zipped file from the GitHub release. Note the dependsOn property that ensures the Azure Function is created before the extension is added. The complete ARM template is available in the GitHub repository.


One-click Deployment

When you have your artefact and the ARM template uploaded to your GitHub repository, you can create a one-click deployment button. This button will take the user to the Azure portal and pre-fill the deployment form with the information from the ARM template. Here is an example of the button for markdown.

[![Deploy to Azure](https://aka.ms/deploytoazurebutton)](https://portal.azure.com/#create/Microsoft.Template/uri/https%3A%2F%2Fraw.githubusercontent.com%2FFBoucher%2FZipDeploy-AzFunc%2Fmain%2Fdeployment%2Fazuredeploy.json)

The has three parts, the first is the image that will be displayed on the button, the second is the link to the Azure portal and the third is the URL of the ARM template. The URL of the ARM template is the raw URL of the file in the GitHub repository, and it needs to be URL encoded. The URL encoding can be done using a tool like URL Encode/Decode.

Final Thoughts

Zip deployment is a powerful tool in your Azure arsenal by itself of part of a more complex CI-CD pipeline. It's a great way to make it easier for people to deploy your solution in their Azure subscription without having to clone/ fork the repository.


Video version

If you prefer, there is also have a video version of this post.

References

Problem in my local paradise: Func CLI doesn't upgrade

Last Friday, I encountered an issue while trying to run my Azure Function locally using VS Code. Despite having installed the Azure Function extension and the Azure Functions Core Tools, I was unable to execute the func start command without encountering an error saying that no functions could be found. 

In this post, I will share the various troubleshooting steps I took, what didn’t work, and how I ultimately resolved the issue. Spoiler alert: everything is now working correctly.


The Problem

My Azure Function is a .NET 8 Isolated HTTP trigger. When I attempted to execute the func start command, it failed to find any functions. A quick look at the documentation, I discovered that version 4 of the Core Tools was required for type Isolated process. However, I had already installed version 4 via the update popup in VS Code.

VS Code tool update

Something was wrong. I tried func --version and it returned 3.x.xx, weird... And this is how I knew there was a problem.


Failed attempts

Following the Azure Functions Core Tools documentation I found that there were multiple methods to install the Core Tools. Because that laptop was on Windows 11, I started by downloading the func-cli-x64.msi installer and run it. It didn't work, the version 3 was still there.

I tried to install the Core Tools v4 using NPM: npm install -g azure-functions-core-tools@4. It didn't work.

I tried to uninstall the version 3 with npm uninstall -g azure-functions-core-tools. I tried using the command palette in VSCode

VS Code uninstall Core Tool

Still nothing was changing anything, the version 3 was still there.


The Solution

What works, was using Chocolatey command choco uninstall azure-functions-core-tools to uninstall the version 3. Some how, it must have been install at the different location or some "config" got lost at some point (it's a developer laptop after all), and the other methods (npm, msi, vscode) couldn't see that version 3 was installed.

After that, I installed the version 4 using NPM npm install -g azure-functions-core-tools@4. And it worked! The func --version returned 4.0.5571 and the func start command found my function.

I wrote this quick post hoping that it can help someone else, as I cannot be the only one with this problem.


~Frank

It's Time To Ditch your USB Keys

On day 2 of GitKon 2023, I presented a short beginner-friendly introduction to Git without using any "command lines". Too many are still using USB keys today to share files and collaborate on documents. When asked why they don't use Git, the answer is most likely that it's too complicated, too technical, and too much work.

Here is the good news, it doesn't need to be! This video shares the why and how Git is for everyone and share simple tips to make the how accessible!

It's now available on-demand. 🐙

Useful Links

Database to go! The perfect database for developer

When building a new project, we don't need a big database that scales and has lots of data, but we do still need some kind of data source. Of course, it is possible to fake it and have some hardcoded value returned by an API but that takes time to create and it's not a database. In this post, I want to share a solution to have a portable, self-healing, disposable, disconnected database that doesn't require any installation.

The solution? Put the database in a container! It doesn't matter what database you are planning to use or on which OS you are developing. Most databases will have an official image available on Docker Hub and Docker runs on all platforms. If you feel uncomfortable with containers, have no fear, this post is beginner-friendly.

This post is part of a series where I share my experience while building a Dungeon crawler game. The code can be found on GitHub.


The Plan

Have a database ready at the "press of a button". By "ready", I mean up and running, with data in it, and accessible to all developer tools.

Preparation for the Database

We need a script to create the database schema and some data. There are many ways to achieve this. A beginner-friendly way is to create an empty database and use a tool like Azure Data Studio to help create the SQL scripts. Doing it this way will validate that the script works.

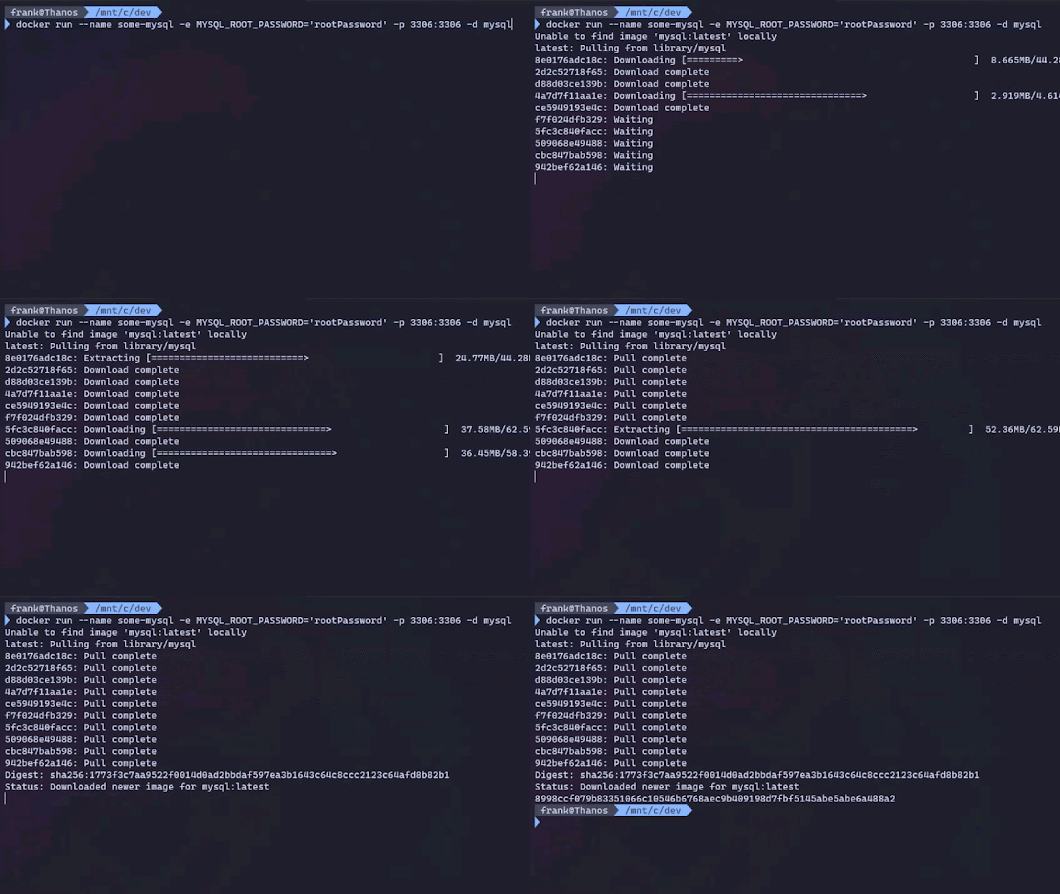
The Docker command to create the database's container will change a little depending on the database you are using but here what's a MySQL one look like:

docker run --name some-mysql -e MYSQL_ROOT_PASSWORD='rootPassword' -p 3306:3306 -d mysql 

Where some-mysql is the name you want to assign to your container, rootPassword is the password to be set for the MySQL root user and -d means that the container will run detached. The -p option is used to map the port 3306 of the container to the port 3306 of the host. This is required to be able to connect to the database from the host.

output of the docker run command


Now, a MySQL server is running inside the container. To connect to the server with Azure Data Studio use the extension MySQL extension for Azure Data Studio. Microsoft has a QuickStart: Use Azure Data Studio to connect and query MySQL if needed. Create a new connection in Azure Data Studio, then create a database (ex: 2d6db).

Create a new connection in Azure Data Studio

You can use the MySQL command-line tool if you prefer, but Azure Data Studio offers a lot of help when you are not that familiar with SQL. You can even use the Copilot extension and ask it to write the SQL statement for you. It's pretty good!

If you want to learn more about this, check the Open at Microsoft episode: Copilot is now in Azure Data Studio and this is how it can help you! to see it in action.

It's fantastic to generate a first draft of the create statements and to make queries.

Copilot writing SQL

Let's create two SQL scripts. The first one will be to create the schema with all the tables. The idea here is to write the script and execute it to validate the results. Here is an example creating only one table to keep the post simple.

-- schema.sql

CREATE TABLE IF NOT EXISTS 2d6db.rooms (
  id int NOT NULL AUTO_INCREMENT,
  roll int DEFAULT 0,
  level int DEFAULT 1,
  size varchar(10) DEFAULT NULL,
  room_type varchar(255) DEFAULT NULL,
  description varchar(255) DEFAULT NULL,
  encounter varchar(255) DEFAULT NULL,
  exits varchar(255) DEFAULT NULL,
  is_unique bool DEFAULT false,
  PRIMARY KEY (id)
);

Now that there are tables in the database, let's fill them with seed data. For this, the second SQL script will contain insert statement to populate the tables. We don't need all the data but only what will be useful when developing. Think about creating data to cover all types or scenarios, it's a development database so it should contain data to help you code.

-- data.sql

INSERT INTO 2d6db.rooms(roll, level, room_type, size, description, exits, is_unique)
VALUES (2,1,'Empty space', 'small','There is nothing in this small space', 'Archways',false);

INSERT INTO 2d6db.rooms(roll, level, room_type, size, description, exits, is_unique)
VALUES (3,1,'Strange Text', 'small','This narrow room connects the corridors and has no furniture. On the wall though...', 'Archways',false);

INSERT INTO 2d6db.rooms(roll, level, room_type, size, description, exits, is_unique)
VALUES (4,1,'Grakada Mural', 'small','There is a large mural of Grakada here. Her old faces smiles...', 'Archways',true);

Note: You can now stop the database's container with the command: docker stop some-mysql. We don't need it anymore.

Putting All the Pieces Together

This is when the magic starts to show up. Using a Docker Compose file, we will start the database container and execute the two SQL scripts to create and populate the database.

# docker-compose.yml

services:
  
  2d6server:
    image: mysql
    command: --default-authentication-plugin=mysql_native_password
    environment:
      MYSQL_DATABASE: '2d6db'
      MYSQL_ROOT_PASSWORD: rootPassword
    ports:
       - "3306:3306"
    volumes:
      - "../database/scripts/schema.sql:/docker-entrypoint-initdb.d/1.sql"
      - "../database/scripts/data.sql:/docker-entrypoint-initdb.d/2.sql"

The docker-compose.yml file are in YAML and usually are used to start multiple containers at once, but it doesn't need to. In this scenario, the file defines a single container named 2d6server using just like the previous Docker command and MySQL image and configuration. The last command volumes is new. It maps the path where the SQL scripts are located to /docker-entrypoint-initdb.d inside the container. When MySQL starts it will execute the files in that specific folder in alphabetic order. This is why the scripts are renamed 1.sql and 2.sql, as the table must be created first.

Do get the database up and ready, we will execute the docker compose up.


# start the database
docker compose -f /path_to_your_file/docker-compose.yml up -d 

# stop the database
docker compose -f /path_to_your_file/docker-compose.yml down -d 

By default, the command looks for a docker-compose.yml file. If you have a different name use the argument -f to specify the filename. Optionally, to free the prompt you can pass the argument -d to be in detached mode.

Docker Compose commands

When you are done coding and you don't need the database anymore, execute the docker compose down command to free up your computer. Compared to when the server is installed locally, a container will leave no trace; your computer is not "polluted".

When you need to update the database, edit the SQL script first. When the scripts are ready, execute the docker-compose restart to get the database refreshed.

To Conclude

Now, you only need to execute one simple command get a fresh database, when you want. All the developers don't need to have a database server installed and configured locally. And you don't need to be worried when deleting or modifying data, like when using a shared database. After cloning the repository all developers will have everything they need to start coding.

In a next post, I will share how I used Azure Data API Builder to generate a complete API on top of the database using the same docker compose method.

Video version!

If you prefer watching instead of reading here the video version of this post!

My Ubuntu laptop finally works with my docking station!

Targus USB-C Docking Station

I've been running Ubuntu on my personal laptop, a Dell Inspiron 13. I love it. It's slim, performant and I can code, play, read, stream without any difficulty. Yet when I try to use my bigger PC monitors by connecting my laptop to a docking station, I've had a lot of trouble. I've tried 2 docking stations, but none of them worked with Ubuntu. Some solutions found online suggest rebuilding my kernel, but I didn't want to do that, it felt too extreme for what should be trivial.

This post is about how I finally got my docking station to work with Ubuntu 22.04.

My current docking station is a Targus USB-C Docking Station and it works perfectly with other Windows devices. While doing some cleaning on my desk a logo catches my attention on the dock; the Displaylink logo. And that was the beginning of the end for the problem with that dock station.


DisplayLink logo on a Targus USB-C Docking Station


After a quick search (aka Googling with DuckDuckGo) I found exactly what I was looking for on Synaptics web site. A solution for the older Linux versions! 

Following the instructions: How to install DisplayLink Software - Ubuntu, I was able to downloads the Synaptics Ubuntu Driver Download and install them in a few minutes. After a reboot... It worked!

I hope it will help others with the same problem. 

How to edit a JSON object inside an Azure Logic App

I use Azure Logic Apps in many of my solutions, I find them so conviennant to integrate different systemes. Recently one of them was failling and by lookink at the error message: The property value exceeds the maximum allowed size, I knew what was wrong. I was tying to save a JSON object into a Storage table but one property was too long. For this particular case I didn't need the value contain in the property so the plan was to delete it. At first, I thought it wasn't possible to edit a variable of type object in a Logic Apps, but it is!

In this post I will show how to use Compose action and setProperty to perform data operations in Azure Logic Apps.

The Context

First think to know is that the Compose action does not update the the current object but creates a new one. In this demo the JSON object use is quite short to simplyfy the demo.

{
	"firstname":"Frank",
	"lastname":"Boucher",
	"alias":"fboucheros",
	"bio":"With many years of experience in the IT industry, François (Frank) Boucher is a trusted Microsoft Azure professional whose expertise and bilingual service are relied upon in large Canadian markets (Ottawa and Montreal) as well as internationally. Among his many accolades, Francois has been awarded four times Microsoft Azure MVP status, named a Microsoft Azure Advisor, and Microsoft Azure P-Seller. Frank created the “Cloud 5 minutes” show. Where every second week, a new episode that answers a different technical question, is published both in French and English (cloud5mins.com). "
}

The Details

The Logic App recieve a JSON object from the request body. This is transfom as an Person object. To empty the bio property the action Compose will be used.

Inside the Compose action, use the context menu to find setProperty in the Expression section. The expression setProperty takes three parameters: the object, the property name, and the edited value. In this demo the goal was to empty the property therefore and empty string will be assign like this:

  setProperty(variables('Person'),'bio','').

The edited object is accessible from the output of the Compose action and this what will be return in the Response action.

The Result

By adding a single action it's possible to edit JSON object in a Logic App without requiring to use inline code or external tools. A demo wouldn't be complite without a end-to-end run so here the result of a HTTP POST to the Logic App passing the Person JSON and the returned result.

Video version

If you prefer, I also have a video version of this post.

Useful links


~ Frank


How to re-open a repository cloned in a volume, from Visual Studio Code

I love Dev Containers, I use them a lot for most of my development. One of my favorite options is to clone a repository directly in a docker volume.


It takes a few seconds and you can work on your code without installing any SDKs or language that your current machine doesn't have. Marvelous!

Ideally, at the end of your session, you push your code to another repository (ex: GitHub). However, sometimes I forget or am interrupted I start working on something else, and my changes are not pushed.

How do you re-open that environment?! In this post, I want to share two ways that I use.

Open Recent

The first method is to use the history of the editor! For example, here in Visual Studio Code, select the File menu and Open Recent.


If you didn't open too many files since you used that dev container, it should be present as displayed in the image. It should look like: <Name of the repository> in a unique [Dev Container].

Make sure docker is already running and select it. Voila, in a snap you are back into the dev environment with your last changes waiting for you.

Open the Container

There are a few different options to do the next solution, I will share the one I consider the easiest for the people who are not Docker experts.

First, if not already present to your VSCode, add the Docker extension identifier: ms-azuretools.vscode-docker. Then from this new extension in the top section named containers search for your container. It should start with "vsc", for Visual Studio Code, then hyphen the name of the repository you cloned. Right-click on it and select start. After a few seconds, the container should have a little green triangle on its side and be ready to continue.


The next step consists of attaching the container to VSCode. Once more, from the Docker extension, right-click on the container and select Attach Visual Studio Code.


This will open a new VSCode window, we are mostly done but there is one last step to do. You will notice that the file explorer is empty. No worries we will fix everything with this last step. The terminal should be open in the home folder of the root user. Let's open our project folder by executing the command:

cd /workspaces/<repository-name>

Then the final command is to re-open VSCode in this folder and let the Dev Container do his magic. Execute the command:

code . -r

(the -r is to re-use the same VSCode windows. It's optional, if not provided it will open a new VSCode instance.)


And voila! The Dev Container is just as it was before.


If you know other ways to achieve this, leave a comment or reach out, I'm always happy to learn more.


~ frank


How to simplify a Docker run command

I recently wanted to create animated GIFs from videos. The idea was to get video previews, in a very lightweight file. After a quick search online, I found FFMPEG, a fantastic multimedia framework to manipulate media. There is also a few wrappers that exists in different languages (ex: C#, JavaScript) but you still need to install FFMPEG locally, and I didn't want that. In fact, I wanted a simple solution that doesn't require any installation locally and something in the cloud. In this post, I want to share how I achieved the first one.

All the code and the container are available on Github and Docker Hub.

First Contact

The ffmpeg framework is very powerful and can do so many things; therefore it's normal that it has a ton of possible parameters and extensions. After time spent on the documentation and a few trials and errors, I found how to do exactly what I needed calling it this way:

ffmpeg -r 60 -i $INPUTFILE -loop 0 -vf scale=320:-1 -c:v gif -f gif -ss 00:00:00.500 -r 10 -t 5 - > $OUTPUTFILE

This will create a five second animated GIF from a video. It speeds up the video and lowers the framerate of the GIF to keep the output lightweight. Here is an example.

Hello World episode 5 seconds preview

This is great, but this is not very friendly. How can someone who only creates a video once in a while be expected to remember all those parameters?! And even harder, when the video is vertical some parameters have different values. It was time to simplify, and here is how I did it. Note that I'm a Docker beginner and if you think there is a simpler or better way to do some steps, let me know, and let's learn together.

The Plan

The plan is simple: execute a simple Docker command like docker run fboucher/aciffmpeg -i NotInTheSky.mp4 and generate a video preview. To build our ephemeral container we will start with something lightweight like alpine, install ffmpeg and add a script that would be executed as the container runs. That sounds like an excellent plan, let's do it!

Writing the Script

The script is simple, but I learned a few things writing it. This is why it's included in this post. The goal was simple: execute the ffmpeg command using some values from the parameters: file path, and if the video is vertical. Here is the script:

#!/bin/sh

while getopts ":i:v" opt; do
  case $opt in
    i) inputFile="$OPTARG"
    ;;
    v) isVertical=true
    ;;
    \?) echo "Invalid option -$OPTARG" >&2
    exit 1
    ;;
  esac

  case $OPTARG in
    -*) echo "Option $opt needs a valid argument"
    exit 1
    ;;
  esac
done

if [ -z "$isVertical" ]; then isVertical=false; fi

# used for bash 
#IFS='.'
#read -a filePart <<< "$inputFile"
#outputFile="${filePart[0]}.gif"

# used for dash 
filename=$(echo "$inputFile" | cut -d "." -f 1)
outputFile="$filename.gif"

if $isVertical
then
  ffmpeg -r 60 -i $inputFile -loop 0 -vf scale=-1:320 -c:v gif -f gif -ss 00:00:00.500 -r 10 -t 5 - > $outputFile
else
  ffmpeg -r 60 -i $inputFile -loop 0 -vf scale=320:-1 -c:v gif -f gif -ss 00:00:00.500 -r 10 -t 5 - > $outputFile
fi

Things I learned: Parameter without values

The script needs to be as friendly as possible, therefore any unnecessary information should be removed. Most videos will be horizontal, so let's make the parameter optional. However, I don't want users to have to specify the value script.sh -i myvideo.mp4 -v true but instead script.sh -i myvideo.mp4 -v. This is very simple to do, once you know it. On the first line of code when I get the parameters: getopts ":i:v" notes that there is no ":" after the "v". This is to specify that we are not expecting any values.

Things I Learned: Bash and Dash

As mentioned earlier the container will be built from Alpine. And Alpine doesn't have bash but instead uses dash as a shell. It's mostly the same, but there are some differences. The first one will be the shebang (aka "#!/bin/sh" on the first line). And the second was the string manipulation. To generate a new file with the same name but a different extension of the script, split the file name at the ".". This can be done IFS ... read... <<< command (commented in the script) on bash but this will give syntax error: unexpected redirection and this is because there is no <<< in bash. Instead, you need to use the command cut -d "." -f 1 (where -d specifies the CHAR to use as the delimiter, and -f return only this field).

Building the image

It's now time to connect all the dots in the dockerfile.

FROM alpine:3.13
LABEL Name=aciffmpeg Version=0.0.2
RUN apk add ffmpeg
COPY ./src/myscript.sh /
RUN chmod +x /myscript.sh
ENTRYPOINT ["/myscript.sh"]

The file is not extremely complex but let’s pass through it line by line. 

  • We start FROM Alpine version 3.13 and apply a LABEL
  • RUN Will execute the command to install ffmpeg. The apk is the default utility on Alpine to install apps just like apt on Ubuntu. 
  • COPY Is copying the script from our local machine into the container at the root. 
  • The second RUN command is to make sure the script is executable. 
  • Finally, ENTRYPOINT will allow us to configure the container to run as an executable in this case as the script. All parameters passed to Docker will be passed to the script.

The only things left now are to build, tag, and push it on Docker Hub.

docker build -t fboucher/aciffmpeg .

docker tag  0f42a672d000 fboucher/aciffmpeg:2.0

docker push fboucher/aciffmpeg:2.0

The Simplified version

And now to create a preview of any video you just need to map a volume and specify the file path and optionally mention if the video is vertical.

On Linux/ WSL the command would look like this:

docker run -v /mnt/c/dev/test:/video fboucher/aciffmpeg -i /video/sample.mp4 -v

And on PowerShell like that:

docker run -v c/dev/test:/video fboucher/aciffmpeg -i /video/sample.mp4 -v

I learned a lot about Docker doing that project and now I have a very useful tool. What are the tools you built using containers that simplify your life or work?

Video Version

I recorded a video version if you are interested. 


~frank


Learning how to Build, Secure, and Deploy your Azure Static Web App in C#

Recently I participated in a series of videos about Azure Static Web Apps: Azure Tips and Tricks: Static Web Apps on Microsoft Channel 9. The series is perfect to get started and cover multiple different scenarios in different Javascript frameworks and C#. In this post, I wanted to regroup the four videos related to .Net Blazor. I also added the GitHub links part of the references at to end.

How to create a web app in C# with Blazor & Azure Static Web Apps

In this video, we start from scratch. We will build and deploy a brand new static website with .Net Blazor.


How to add a C# API to your Blazor web app

Now that you built your web app with C# and Blazor, what about adding a serverless C# API to it? Have a look!


How to secure your C# API with Azure Static Web Apps

Prevent unwanted users to access your C# API by configuring authentication and authorization in your Blazor Azure Static Web Apps.


I hope those videos will help you to get started. If you have questions and/or comments don't hesitate to reach out (comments, DM, GitHub issues), it's always a pleasure.

How CI/CD and preview branches work with Azure Static Web Apps

In this video, I wanted to show one of the great features of Azure Static Web App Learn: the creation of pre-production environments. Using the CI/CD workflow, you can preview your pull requests changes before it's in production leveraging the automatic creation of pre-production environments!


References:

How to Create a Continuous Integration Continuous Deployment (CI-CD) Solution for a Docker Project


I'm not a Docker master, but I understand that it's very useful and I like to use it from time to time in some projects. Another thing I like is DevOps and automation and in a project I have, I was missing that. In the previous setup, the container was built and publish to DockerHub with the date as a tag. Nice but not very easy to now with versions are "stable" and wish one are "in progress".

This post is about how I build a continuous integration and continuous deployment solution for my docker project. All the code is on GitHub and Docker Hub. I sharing my journey so others can enjoy that automation and not spend a weekend building it.

The Goal

By the end of this build, there will be two GitHub Action to build and publish a different version of the application on Docker Hub.

The release version: every time a release is published on GitHub a container tag with the matching version number will be built and published. (ex: myapp:v1)

The beta version: At every push in my branch on GitHub a container will be published with a specific tag. The tag will be matching the draft release version number with -beta. (ex: myapp:v2-beta).

In this post, the application is a Node.js Twitch chatbot. The type of application is not important the post focus on the delivery.

Publishing the release version

Every time a release is published on GitHub, the workflow will be triggered. It will first retrieve the "release version" then build and tag the container with it and finally publish (aka push) it to Docker hub. Because a "release" is also a "stable" version it will also update the container tag latest.

Let's look at the full YAML definition of the GitHub Action and I will break it down after.

name: Release Docker Image CI

on:
  release:
    types: [published]
jobs:
  update:
    runs-on: ubuntu-latest
    steps:
    - uses: actions/checkout@v2
    - name: Set outputs
      id: vars
      run: echo ::set-output name=RELEASE_VERSION::$(echo ${GITHUB_REF:10})
    - name: Publish to Registry
      uses: elgohr/Publish-Docker-Github-Action@master
      with:
        name: ${{secrets.DOCKER_USER}}/cloudbot
        username: ${{ secrets.DOCKER_USER }}
        password: ${{ secrets.DOCKER_PASSWORD }}
        tags: "latest,${{ steps.vars.outputs.RELEASE_VERSION }}"

To limit how many times the workflow is triggered I used on: release and the type: published, adjust as you like.

The next interesting part is the lines in the step vars.

- name: Set outputs
    id: vars
    run: echo ::set-output name=RELEASE_VERSION::$(echo ${GITHUB_REF:10})

Here I use the environment variable GITHUB_REF (striped of the 10 first characters contains "refs/tags/") to initialize a local variable RELEASE_VERSION. The value is available from the outputs of that step, like on the last line of the YAML.

tags: "latest,${{ steps.vars.outputs.RELEASE_VERSION }}"

From the steps identified by the id vars I retrieved from the outputs the value of RELEASE_VERSION.

In this GitHub Action, I used elgohr/Publish-Docker-Github-Action@master because it was simple and was doing what I need. You can execute docker commands directly if you prefer or use the docker/github-actions.

There are many options available from the GitHub marketplace.

Publishing the beta version

Every time a push is done on GitHub, the workflow will be triggered. It will first retrieve the "release version" of the most recent release in draft mode. The workflow will happen -beta to the retrieved version and use this to tag the container. Finally, publish (aka push) it to Docker hub.

Once more, here full YAML, I will break it down after.

name: Build Docker Images
on: [push]
jobs:
  build:
    name: cloudbot-beta
    runs-on: ubuntu-latest
    steps:
    - id: last_release
      uses: InsonusK/get-latest-release@v1.0.1
      with:
          myToken: ${{ github.token }}
          exclude_types: "release, prerelease"
          view_top: 1  
    - uses: actions/checkout@v2
    - name: Publish to Registry
      uses: elgohr/Publish-Docker-Github-Action@master
      with:
        name: ${{secrets.DOCKER_USER}}/cloudbot
        username: ${{ secrets.DOCKER_USER }}
        password: ${{ secrets.DOCKER_PASSWORD }}
        tags: "${{ steps.last_release.outputs.tag_name }}-beta"

Here the difficulty was that I wanted to create a tag from a "future" version. I decided to use the Draft Releases because those are not visible by everyone, therefore they look like the future.

If your last release is version 1 (v1.0), to make this workflow possible you will need to create a new release and save it in Draft.


Like in the Release workflow, I need to retrieve the version. Because drafts are only visible to some people we will need to get access. This is easily done by using a github.token. Those are created automatically when the GitHub Action starts.

Then using the step InsonusK/get-latest-release we will retrieve the version.

- id: last_release
    uses: InsonusK/get-latest-release@v1.0.1
    with:
        myToken: ${{ github.token }}
        exclude_types: "release, prerelease"
        view_top: 1  

This time when passing the value for the tag we will concatenate "-beta" to it.

tags: "${{ steps.last_release.outputs.tag_name }}-beta"

Wrapping Up

And voila, a very simple and easy to implement ci-cd for a container project. There are many different options, looking forward to learning how you did yours?

How to configure a secured custom domain on a Azure Function or website

I wanted to create this tutorial for a long time. How to map a naked domain on an Azure resource. It looks so complicated, but once you know what to do it's kind of simple in fact. In this post, I will share the three simple steps to do exactly this.

Step 1: Add Custom Domain


The first step is to map a domain on the application. The method I will explain uses a "www" domain (ex: www.fboucher.dev). To map directly a naked domain (ex: fboucher.dev) you would need to buy a wildcard certificate. However, I will show you in step three how to walk around this issue by using DNS rules.

From the Azure portal, open the Azure Function or App Service. From the left menu search for "custom", click the Custom domains option. In this panel click the button Add custom domain, and enter your www domain.


Click the validate button and follow the instruction to make the connection between the App Service and your domain provider.

Step 2: Adding a Certificate


Now that your custom domain is mapped, let's fix the "not secure" warning by adding a certificate. From the Azure portal return in the App blade. Repeat the previous search for "custom", and select the option TLS/SSL settings. Click the Private Key Certificates, and the Create App Service Managed Certificate button. Select the domain previously added and saved. It will take a few moments to create the certificate.


Go back in the Custom domains blade and click the Add binding button. Select the domain and certificate, don't forget to select the SNI SSL option and click the Add Binding button.


Step 3: Create the DNS Rules

Create an account in cloudflare.com and add a site for your domain. We will need to customize the DNS and create some Page Rules.


On the cloudflare.com note the 2 nameservers addresses. Go to the origin name provider (in my case godaddy) and replace the names of the nameservers with the value found on cloudflare.


Create a rule that will redirect all the incoming traffic from the naked-domain to www.domain. On the option on the top, click the Pages Rules (B). Then Click the Button Create Page Rule


In the field for If the URL matches: enter the naked-domain follow by /*. That will match everything coming from that URL

For the settings select Forwarding URL and 301- Permanent Redirect. Then the destination URL should be https://www. with your domain and /$1.


References

🔗 Map an existing custom DNS name to Azure App Service: https://c5m.ca/customDomain 

🔗 Secure a custom DNS name with a TLS/SSL binding in Azure App Service: https://c5m.ca/tls-ssl

How to Manage Azure Resources

What ever you are on running on Linux, Mac or Windows that you are on the road or in the comfort of your office there is many different ways to manage your Azure resources. In this video I will show you five ways to do it and explain the pros and cons of each:

  1. Azure Portal
  2. Azure PowerShell
  3. Azure CLI
  4. Azure Mobile App
  5. Azure Cloud Shell

There is also an excellent Microsoft Learn module that will teach you how to use the Azure portal efficiently.

References

Simplify your deployment with nested Azure Resource Manager (ARM) templates


Most solutions, if not all, are composed of multiple parts: backend, frontend, services, APIs, etc. Because all parts could have a different life-cycle it's important to be able to deploy them individually. However, sometimes we would like to deploy everything at once. It's exactly the scenario I had in a project I'm working on where with backend and one frontend.

In this post, I will explain how I use nested Azure Resource Manager (ARM) templates and conditions to let the user decide if he wants to deploy only the backend or the backend with a frontend of his choice. All the code will be available in GitHub and if you prefer, a video version is available below.
(This post is also available in French)

The Context


The project used in this post my open-source budget-friendly Azure URL Shortener. Like mentioned previously the project is composed of two parts. The backend leverage Microsoft serverless Azure Functions, it a perfect match in this case because it will only run when someone clicks a link. The second part is a frontend, and it's totally optional. Because the Azure Functions are HTTP triggers they act as an API, therefore, they can be called from anything able to do an HTTP call. Both are very easily deployable using an ARM template by a PowerShell or CLI command or by a one-click button directly from GitHub.

The Goal


At the end of this post, we will be able from one-click to deploy just the Azure Functions or to deploy them with a frontend of our choice (I only have one right now, but more will come). To do this, we will modify the "backend" ARM template using condition and nest the ARM template responsible for the frontend deployment.

The ARM templates are available here in there [initial](https://github.com/FBoucher/AzUrlShortener/tree/master/tutorials/optional-arm/before) and [final](https://github.com/FBoucher/AzUrlShortener/tree/master/tutorials/optional-arm/before/after) versions.

Adding New Inputs


We will nest the ARM templates, this means that our backend template (azureDeploy.json) will call the frontend template (adminBlazorWebsite-deployAzure.json). Therefore we need to add all the required information to azureDeploy.json to make sure it's able to deploy adminBlazorWebsite-deployAzure.json successfully. Looking at the parameter required for the second template, we only two need values AdminEMail and AdminPassword. All the other can be generated or we already have them.

We will need also another parameter the will act as our selection option. So let's add a parameter named frontend and allowed only two values: none and adminBlazorWebsite. If the value is none we only deploy the Azure Function. When the value is adminBlazorWebsite we will deploy the Azure Function, of course, but we will also deploy an admin website to go with it.

Following the best practices, we add clear detail and add those three parameters in the parameters section of the ARM template

"frontend": {
    "type": "string",
    "allowedValues": [
        "none",
        "adminBlazorWebsite"
    ],
    "defaultValue": "adminBlazorWebsite",
    "metadata": {
        "description": "Select the frontend that will be deploy. Select 'none', if you don't want any. Frontend available: adminBlazorWebsite, none. "
    }
},
"frontend-AdminEMail": {
    "type": "string",
    "defaultValue": "",
    "metadata": {
        "description": "(Required only if frontend = adminBlazorWebsite) The EMail use to connect into the admin Blazor Website."
    }
},
"frontend-AdminPassword": {
    "type": "securestring",
    "defaultValue": "",
    "metadata": {
        "description": "(Required only if frontend = adminBlazorWebsite) Password use to connect into the admin Blazor Website."
    }
}

Nested Templates


Let's assume for now that we always deploy the website when we deploy the Azure Function, to keep things simple. What we need now is to used nested ARM template, and that when you deploy an ARM template from inside another ARM template. This is done with a Microsoft.Resources/deployments node. Let's look at the code:

{
    "name": "FrontendDeployment",
    "type": "Microsoft.Resources/deployments",
    "dependsOn": [
        "[resourceId('Microsoft.Web/sites/', variables('funcAppName'))]",
        "[resourceId('Microsoft.Web/sites/sourcecontrols', variables('funcAppName'), 'web')]"
    ],
    "resourceGroup": "[resourceGroup().name]",
    "apiVersion": "2019-10-01",
    "properties": {
        "mode": "Incremental",
        "templateLink": {
            "uri": "[variables('frontendInfo')[parameters('frontend')].armTemplateUrl]"
        },
        "parameters": {
            "basename": {
                "value" : "[concat('adm', parameters('baseName'))]"
            },
            "AdminEMail": {
                "value" : "[parameters('frontend-AdminEMail')]"
            },
            "AdminPassword": {
                "value" : "[parameters('frontend-AdminPassword')]"
            },
            "AzureFunctionUrlListUrl": {
                "value" : "[concat('https://', reference(resourceId('Microsoft.Web/sites/', variables('funcAppName')), '2018-02-01').hostNames[0], '/api/UrlList?code=', listkeys(concat(resourceId('Microsoft.Web/sites/', variables('funcAppName')), '/host/default/'),'2016-08-01').functionKeys.default)]"
            },
            "AzureFunctionUrlShortenerUrl": {
                "value" : "[concat('https://', reference(resourceId('Microsoft.Web/sites/', variables('funcAppName')), '2018-02-01').hostNames[0], '/api/UrlShortener?code=', listkeys(concat(resourceId('Microsoft.Web/sites/', variables('funcAppName')), '/host/default/'),'2016-08-01').functionKeys.default)]"
            },
            "GitHubURL": {
                "value" : "[parameters('GitHubURL')]"
            },
            "GitHubBranch": {
                "value" : "[parameters('GitHubBranch')]"
            },
            "ExpireOn": {
                "value" : "[parameters('ExpireOn')]"
            },
            "OwnerName": {
                "value" : "[parameters('OwnerName')]"
            }

        }
    }
}

If we examine this node, we have the classic: name, type, dependsOn, resourceGroup, apiVersion. Here We really want the Azure Functions to be fully deployed so we need the FunctionApp to be created AND the GitHub sync to be complete, this is why there is also a dependency on Microsoft.Web/sites/sourcecontrols.

In properties we will pass the mode as Incremental as it will leave unchanged resources that exist in the resource group but aren't specified in the template.

Learn more about the Azure Resource Manager deployment modes here as they are very powerful.

The second property is templateLink. This is really important as it's the URL to the other ARM template. That URI must not be a local file or a file that is only available on your local network. You must provide a URI value that downloadable as HTTP or HTTPS. In this case, it's a variable that contains the GitHub URL where the template is available.

Finally, we have the parameters, and this is how we pass the values to the second template. Let's skip those where I just pass the parameter value from the caller to the called, and focus on basename, AzureFunctionUrlListUrl, and AzureFunctionUrlShortenerUrl.

For basename I just add a prefix to the parameter basename received, this way the resource names will be different but we can still see the "connection". That's purely optional, you could have added this value in a parameter to azureDeploy.json, I prefer keeping the parameters a minimum as possible as I think it simplifies the deployment for the users.

Finally for AzureFunctionUrlListUrl, and AzureFunctionUrlShortenerUrl I needed to retrieve the URL of the Azure Function with the security token because they are secured. I do that by concatenating different parts.

Component Value
Beginning of the URL 'https://'
Reference the Function App, return the value of hostname reference(resourceId('Microsoft.Web/sites/', variables('funcAppName')), '2018-02-01').hostNames[0]
Specify the Function targeted in this case UrlList. And starting the querystring to pass the code (aka. security token) '/api/UrlList?code='
Using the new listkeys function to retrieve the default Function key. listkeys(concat(resourceId('Microsoft.Web/sites/', variables('funcAppName')), '/host/default/'),'2016-08-01').functionKeys.default

Conditional parts


Now that the second ARM template can be deployed, let's add a condition so it gets, indeed, deploy only when we desire. To do this it's very simple, we need to add a property condition.

{
    "name": "FrontendDeployment",
    "type": "Microsoft.Resources/deployments",
    "condition": "[not(equals(parameters('frontend'), 'none'))]",
    "dependsOn": [
        "[resourceId('Microsoft.Web/sites/', variables('funcAppName'))]",
        "[resourceId('Microsoft.Web/sites/sourcecontrols', variables('funcAppName'), 'web')]"
    ]
}

In this case, is the value of the parameter is different then none, the nested template will be deployed. When a condition end-up being "false", the entire resource will be ignored during the deployment. How simple or complex are your conditions... that's your choice!

Happy deployment. :)


How I Build a Budget-friendly URL Shortener Easy to Deploy and Customized


Available in French here

I don't know for you but I share links/ URLs very often. And a lot of time it's from videos, so it needs to be short and easy to remember. Something like https://c5m.ca/project is better than a random string (aka. GUID). And this is how I started a project to build a URL Shortener. I wanted to be budget-friendly, easy to deploy and customizable.

In this post, I will share how I build it, how you can use it, and how you can help!

Azure Url Shortener

How I build it, with the community


This tool was build during live streams coding sessions on Twitch (all videos are in available in my YouTube archive). It's composed of two parts: a Serverless backend leveraging the Azure Function & Azure Storage, and a frontend of your choice.

The backend is composed of a few Azure Functions that act as an on-demand HTTP API. They only consume when they are called. They are in .Net Core, C# to be specific. When publishing this post, there are four functions:

  • UrlShortener: To create a short URL.
  • UrlRedirect: That's the one called when a short link is used. An Azure Function Proxy is forwarding all call to the root.
  • UrlClickStats: Return the statistic for a specific URL.
  • UrlList: Return the list of all URLs created.

All the information like long url, short url, click count are save in an Azure Storage Table.
And that's it. Super light, very cost-efficient. IF you are curious about the price I'll but references in the footnotes

The frontend could be anything that can make HTTP requests. Right now in the project, I explain how to use a tool call Postman, there is also a very simple interface done that you can easily deploy.


This simple interface is of course protected and gives you the options to see all URLs and create new ones.

How YOU can use it


All the code is available into GitHub, and it's deployable with a one-click button!

Deploy to Azure

This will deploy the backend in your Azure subscription in a few minutes. If you don't own an Azure subscription already, you can create your free Azure account today.

Then you will probably want an interface to create your precious URLs. Once more in the GitHub repository, there is a List of available Admin interfaces and ready to be used. The Admin Blazor Website is currently the most friendly and can also be deployed in one-click.

How You can help and participate


Right now, there is really only one interface (and some instructions on how to use Postman to do the HTTP calls). But AzUrlShortener is an open-source project, meaning you can participate. Here some suggestions:

  • Build a new interface (in the language of your choice)
  • Improve current interface(s) with
    • logos
    • designs
    • Better UI 🙂
  • Register bugs in GitHub
  • Make feature request
  • Help with documentation/ translation

What's Next


Definitely come see the GitHub repo https://github.com/FBoucher/AzUrlShortener, click those deploy buttons. On my side, I will continue to add more features and make it better. See you there!


Video version


References